Keystroke: Ctrl + F11
Your embosser selection and page size information can be set on this dialog for the current document. The settings made here are stored with the document as "Sticky Document Information". If you save your document and reopen it later, the settings are retained, and there is no need to set them again.
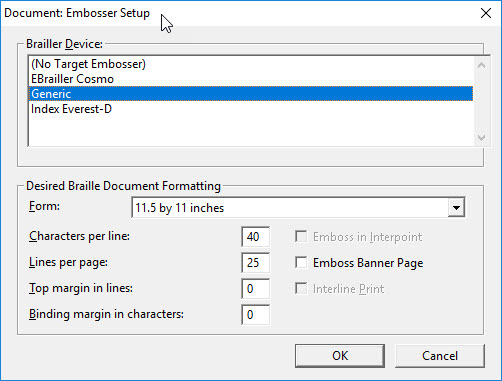
The Document: Embosser Setup dialog is shown below:

The controls on this dialog are quite straightforward.
Brailler Device: is a multi-line list of all your installed embossers. The most important thing you should understand about this control is this: the current document will be embossed using whichever embosser is highlighted when you click OK to exit the dialog. If you have only one embosser, this is not usually a concern.
Form: This drop-down list shows what forms (paper sizes) are supported by your embosser. The name of the form you choose is stored with the current document when the document is saved. So you can be sure that
Characters per Line and Lines per Page: DBT automatically fills in these two edit controls when you choose an embosser and form (paper size), but you can change the values. Note that Characters per line exclude the binding margin; Lines per page exclude the top margin. Maximum allowed values for the selected form size are enforced.
Top margin in Lines: Enter the number of lines you wish to leave as a top margin. (The Lines per Page given above is in addition to the top margin. The bigger the margin, the fewer the maximum lines per page.)
Binding Margin in Characters: Enter your desired
In the right-hand column are three check boxes that are enabled only if supported by your currently selected embosser.
Emboss in Interpoint: Checking this option selects Interpoint (double-sided) embossing. (Braille dots on the back side are offset from the dots embossed on the front side, hence the term "inter-point".)
Banner Page: This optional leader page provides basic file information to identify the document; it can be embossed at the beginning of each job you output.
Interline Print: The Interline Print option interleaves the print version of each embossed line for print-capable embossers.
In some cases, Embossing in Interpoint or using Interline Print might reduce the number of lines that your embosser can fit on a page.
OK: When you are finished, this button accepts all settings in the dialog and applies them to the current document only. If you have specified impossible values (e.g. 200 characters per line), then the dialog automatically corrects your values, displays what has been corrected, and leaves the dialog open for you to check. If everything in the dialog is fine, then the dialog is closed.
However, you may see a warning message if your document format is about to change from what is was before.
Cancel: is used close the dialog without saving anything.
Read on for some time-savers and warnings.
Despite the many controls, you can often get through Document Embosser Setup in just three steps:
Your line width, lines per page, and margins are set automatically as appropriate for the selected embosser and paper size.
Use
If you have used versions of DBT earlier than 10.5, just keep in mind that Document: Embosser Setup changes only the current document, while Global: Embosser Setup changes the format only for documents yet to be created. (This is explained in detail in the help topic Global: Embosser Setup.)
Even if you bring up the dialog just to adjust a single detail like the binding margin, you must push OK, or everything you have done will be lost.
If you bring up the dialog only to compare form sizes or embossers on your installed list, be sure to leave the embosser in use highlighted and the same form size selected as when you started, or you may be applying changes that you did not intend. If you forget what was selected on entering the dialog, you can use Cancel to ensure nothing is changed accidentally.