Modifying Styles
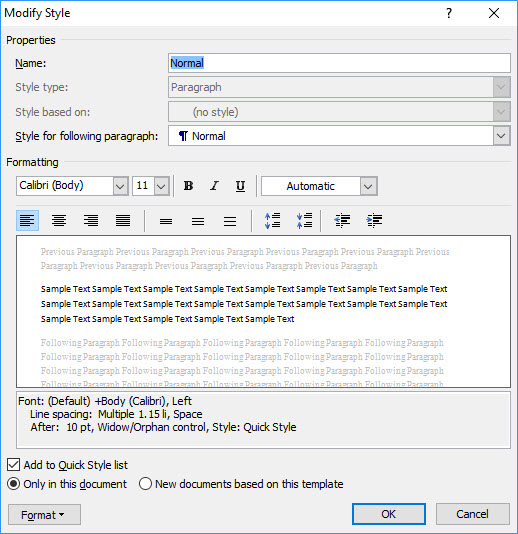
There many ways of getting to the Modify Styles dialog in Word.
- Right click on a style name, and click on the Modify button.
- Highlight an entire paragraph, right click, pick Styles, and use the previous element
- From the Home Pane, press Ctrl-Alt-Shift S to open the Styles pane. Click on the bottom icon with a pencil (Manage Styles), click on a style name and press the Modify Styles button

Note: For those using a screen reader, as you tab, or shift tab, though this dialog, descriptions of each element should be spoken.
We are going to concentrate on the "Formatting" controls for now, which are on two lines.
The first element is a drop down list which allows you to select the Font you wish to use for your Style. Next is a drop down list which allows you to select the size of the Font in Points. Three icons appear next representing: B (Bold), I (Italic) and U (Underlining). (If you have tabbed onto one of these, the Enter key toggles the control attribute on or off.) Finally, there is a control to allow selecting a color. By default the color is "Automatic", which usually produces black in print.
On the next line are four groups of controls represented by icons: one group of 4 icons, one of 3, and two groups of 2 each.
The first group is for the alignment of the text, with icons to select: Left aligned, Centered, Right aligned, or Justified. ("Justified" indicates text is aligned to both the left and right margins as is seen in newspapers and some books.)
The second group allows lines in a paragraph to have less space, normal space, or more space between them, according to the icon selected.
The third group (2 icons) increases or decreases the space between paragraphs.
The fourth group (2 icons) lessens or increases the left indent of the paragraph.
The next element is a read-only text box that previews the appearance of the Style as modified so far. It is followed by a text description of the style font, size, and spacing.
The next control is a check box labeled "Add to Quick Style List". The Quick Style List is an item in the ribbon which displays the styles you use regularly. It is checked by default. There may also be a second check box labeled "Automatically Update". This is usually unchecked and may be left as it is for now.
Now for the important part, do you want your changes to apply just to this document, or to all documents that use this same Word template? You need to select one of the 2 radio buttons accordingly. The first time around, you may want to limit your changes to an existing document until you are sure you are happy with how all the modified styles look.
At the bottom is a button labeled "Format" which provides yet more detailed control over the look of the modified style.
Finally, to save your changes, click the OK button. Or, to abort the changes, click Cancel.