The "initial" Style
The initial style is a special DBT style that is called automatically for each new document to establish the basic formatting and rules to be applied on the entire text. Exactly what it does depends on how it is defined. Like all styles, its definition consists of DBT codes.
This feature is probably easiest to explain by example.
Example 1: Creating a Simple "initial" Style
Suppose you wish to create a document that is to be translated into Grade 1 braille. Or going a bit further, suppose you wish to create a custom template where any file you use it for will be translated into Grade 1 braille. The additions you need to make to the initial style will be the same; the difference will be whether or not you need to save a custom template. That is the more complicated case, but also the more common one.
Assume you wish to use the template, "English (UEB) - BANA" as a basis.
- From the File menu, Open a new document and select "English (UEB) - BANA".
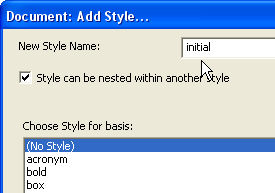
- Open the Document menu and select Add Style. In the "New Style Name" text box, enter "initial".
- Note: This template actually already has an "initial" style. For this example, do not be concerned about whether the style already exists. Leave "Choose Style for basis" on "(No Style)".
- Click on OK.

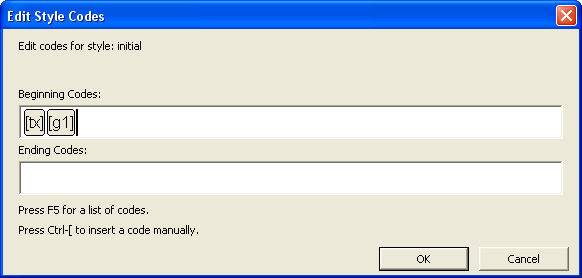
- The "Edit Style Codes" dialog appears.
- In the "Beginning Codes" text box of this dialog, enter these two codes to produce Grade 1 braille: [tx][g1]. As the dialog instructions show, to enter the brackets for each code, press Ctrl + [ (or use the F9 function key). The cursor is automatically placed for you to enter the code. Do this for each of the 2 codes. You do not need to enter anything into the "Ending Codes" text box.

- Click the OK button. This first posts a dialog where you confirm that you want to replace the old "initial" style. Then it returns you to your blank document. That completes the editing of your initial style.
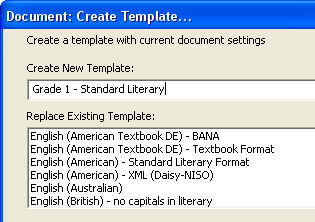
- Next, to create the custom template, open the Document Menu and select "Create Template".
- In the "Create New Template" text box, type an appropriate name, such as, "Grade 1 - Standard Literary", and click the OK button.

- To save your new template, go to the File menu and close the document without any further editing.
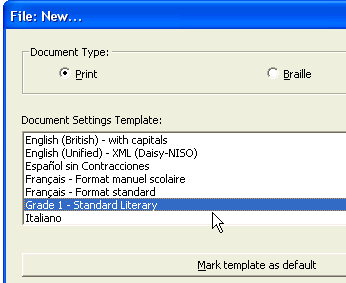
Hereafter, when you import or create a new file, you will find your custom template listed among the template choices in alphabetical order.


And, of course, when you translate your print document, you will find that the braille document is rendered in Grade 1 braille.
Notes on the First Example
First, given that the base template for this example already has an initial style, we could have used the Modify Style command to make our changes. Normally, we use Add Style to start from scratch.
Second, most templates do include an initial style, although in some templates the initial style might be hidden. In the Apply Style or Modify Style dialog, you can check that possibility using the Show list box and choosing the option "All Styles" to make it visible.
Example 2: A Complex "initial" Style
The example above does not illustrate the full potential of the initial style. A good example of this potential can be seen in the template "English (British Pre-UEB) - no caps in literary", where the initial style contains a whole set of page format and translation control codes:
[svant3][svdac~1][svles1:1:0][caplv1][svcbh~"]
[svant3] sets both the running header and the reference page number to reflect any change of chapter name or reference page that occurs mid-page.
[svdac~1] determines the decimal alignment character (decimal point) to use. Here the ASCII Braille character "1" indicates the braille decimal point is to be represented by dot 2.
[svles1:1:0] dictates the formatting for reference page numbers. (Here, use British style numbering at the page break and on continuation pages, with 0 lines required after the print page break line.)
[caplv1] suppresses capital letters in literary braille only (they remain allowed in technical notation).
[svcbh~"] defines the hyphen character to use when in computer braille to be dot 5.
If the first example had started from this template, and chosen the existing initial style as a basis, then added the [tx] and [g1] codes as above, any imported or new document would be translated into Grade 1 braille in addition to the formatting defined by these initial directions.