Let us begin with a case study. Add a Table of Contents to a Word document in around 10 seconds!
Understanding how a table of contents is done in Word can be of great benefit in producing braille tables of contents.
In a real life transcription example, we had a users manual for a music product which ran 342 pages. Though specifically written for visually impaired and blind users of the product, navigation with a screen reader was virtually impossible because it was all plain text, not a single Word style had been used to identify the elements of the document.
Ironically, it did include a large, manually-built, Table of Contents (TOC) of 568 entries, a process which took a huge amount of time and effort. However, the TOC referred to print pages and so was not user friendly for braille. Furthermore, it was laborious to maintain. Any change to the content, any addition or edit, would require changing the page numbering from that point forward in the TOC.
This document needed to be made more accessible. The first step was to apply styles to the headings throughout the document, marking them as Heading 1, Heading 2, or Heading 3, as appropriate. The result was a document that a screen reader user could scan quickly by navigating through the headings, all identified by their styles.
Having uniformly styled headings is the key to automatically generating a Table of Contents.
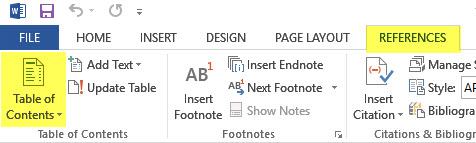
To do that we placed the cursor where the TOC was to be placed. Next we selected the "References" ribbon.
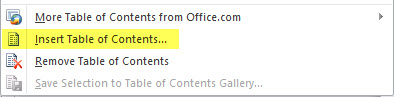
Clicking on the Table of Contents icon, presents a long list of options. At the bottom of this list you will find, "Insert Table of Contents".
Then the following screen displays. Here we made no changes other than to ensure that the three check boxes: Show page numbers, Right align page numbers, and Use Hyperlinks instead of Page Numbers, were all checked.

The example we used to illustrate this was witnessed by 25 teachers on a course. On an old Windows 7 laptop, a table of contents containing 68 Chapter headings, 431 second level headings, and 59 third level headings, and running to just over 14 A4-size pages, took only 8 seconds to complete.
First, time savings!
Second, the document author now can quickly go to any specific part of the document to edit, because the TOC provides a link to each section.
Third, if text is added or removed, such that it will change page numbers, all that is needed is to right click anywhere in the TOC. The following dialog appears.
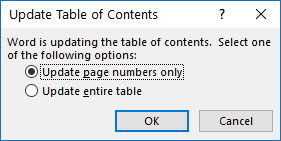
Select the appropriate option, and a few seconds later your TOC is again fully up to date.
Because it is so easy to update the TOC, if you make a mistake, you can easily correct it. And because the TOC provides links, it is quicker to get to where corrections need to be made.
In this example case, we had missed out applying some Heading styles, and also had applied some wrong Heading levels - all easy fixes.
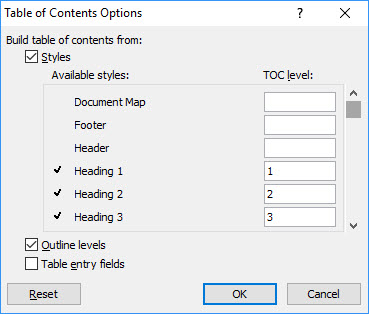
You might wish to explore the Table of Contents dialog shown up above. For example, the Options button brings up the following dialog which allows you to select which styles appear in your TOC. Similarly the Modify button allows you to change the TOC appearance.
Finally, a document that uses styles can also map those styles to the appropriate DBT styles for braille, saving a lot of labor in the DBT editor.