For those familiar with DBT, you are probably acquainted with many of DBT’s Codes and how they are inserted into a document. If not, this subject is covered in DBTHelp in the section on Codes and the related sub-topics. (See Codes.)
It is possible to add DBT Codes into a Word document as well, and this topic provides you with a basic introduction as to how and why that is done.
Note: The following example was prepared to show the use of DBT Codes with pre-UEB braille translation. It may be obsolete for UEB braille, but it does illustrate how to insert DBT codes into MS Word documents.
One of the most common reasons might be where you have a Word Template which is designed as a letter heading. Your letter heading might look like this:
Duxbury Systems, Inc.,
270 Littleton Rd., Unit 6,
Westford, MA
01886-3523 USA
Telephone: +1 978 692 3000
Fax: +1 978 692 7912
Web: https://www.duxburysystems.com
Email: General inquiries: info@duxsys.com
From a general perspective, this might at first appear quite a simple piece of text to translate into braille. However, depending on which country’s braille rules you use, you may notice some things which require special treatment to import into DBT.
Braillists will immediately notice that it contains a web address and an e-mail address. These are normally translated (pre-UEB) using "Computer Braille".
In many countries, acronyms such as MA and USA should be preceded with a letter sign.
There is a full list of Codes in alphabetical order in the Codes Quick Reference. Also, the most popular Codes are explained in more detail, broken down by category, such as Text, Line, Paragraph, etc.
It is quite simple. In DBT, Codes are entered various ways, but essentially end up appearing between a left and right square bracket: "[pg]" (for "New Page").
In Word, you use a slightly different format. For the above example, you would type [[*pg*]]. That is, double left square bracket, asterisk, the DBT Code, asterisk, double right square bracket.
Duxbury Systems, Inc.,
270 Littleton Rd., Unit 6,
Westford, [[*ii*]]MA
01886-3523 [[*ii*]]USA
Telephone: +1//978//692//3000
Fax: +1//978//692//7912
Web: [[*cbi*]][[*wb-cb*]]<b><MadCap:variable name="Primary.CompanyWeb" />[[*wb*]][[*txi*]]
Email: General inquiries: [[*cbi*]][[*wb-cb*]]info@duxsys.com[[*wb*]][[*txi*]]
[[*ii*]] – this inserts a letter sign (In British English, dots 5.6)
[[*cbi*]] – change to Computer Braille Code. (CBI)
[[*wb-cb*]] – use computer braille word-breaking rules.
[[*wb*]] – return to normal word- breaking rules.
[[*txi*]] – revert to the grade of braille used for main document.
That is to say, it can be difficult to see where all the codes are placed.
Now comes the slightly technical bit. We are going to create a new Character Style in Word. Moreover, we are going to change the colour of the font used, and then we are finally going to make it into "Hidden Text".
Depending on your version of Word, click on the Format menu (or Alt + o) and select "Styles and Formatting (or s), or click on the Styles icon button. A Styles and Formatting (or simply "Styles") dialog will come up. Click on the New Style button.
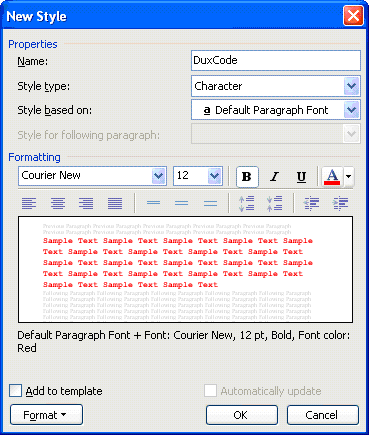
You will now see a New Style dialog appear something like that shown below. Let us call our new Style "DuxCode" (Without the quotes)
For Style Type make absolutely sure you select "Character".
For the purpose of this exercise, we have selected a Courier New Font, 12-point in size, bold, and coloured red.
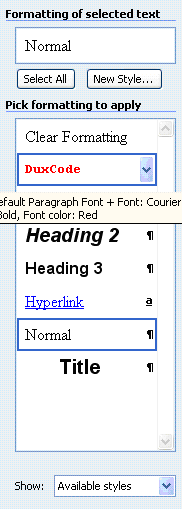
When you click OK, you will find that your new style has appeared in Word's list of available styles.
In case you are wondering, we have not at this stage made our character style "hidden", we will do that soon.


Now we can apply the DuxCode Style to our letter heading template, making it look like this. With the style applied the Codes stand out. (How to hide them is explained in the next section.)
Duxbury Systems, Inc.,
270 Littleton Rd., Unit 6,
Westford, [[*ii*]]MA
01886-3523 [[*ii*]]USA
Telephone: +1 978 692 3000
Fax: +1 978 692 7912
Web: [[*cbi*]][[*wb-cb*]]<b><MadCap:variable name="Primary.CompanyWeb" />[[*wb*]][[*txi*]]
Email: General inquiries: [[*cbi*]][[*wb-cb*]]info@duxsys.com[[*wb*]][[*txi*]]
All we need to do is a slight "tweak" to our DuxCode Style.
Go to your list of styles, select the "DuxCode" style, and select "Modify" (which may be a right-click).
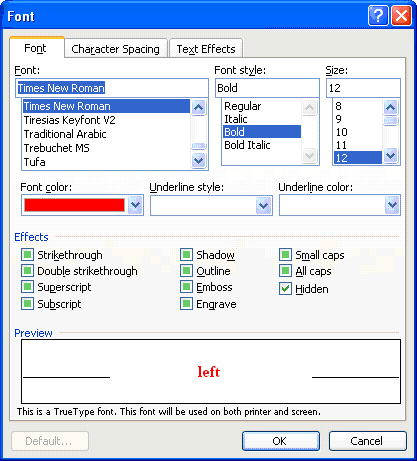
Click on the "Format" button at the bottom left of the dialog. A list will come up from which you should select "Font". This brings up a dialog like the following. Simply check the "Hidden" box so that a tick appears. Click on OK.

All things being equal, your DuxCode red text should disappear.
But what if it does not? Read on.
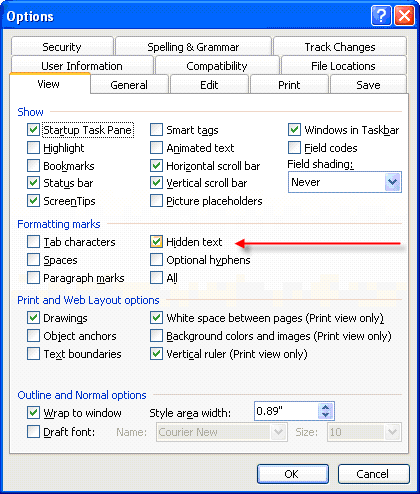
In older versions of Word, this is done with the Tools menu. Select Options. Then make sure you select the View Tab. In the formatting marks, check "Hidden Text" if you want to see the Codes, and uncheck it if you do not. In later versions you will find this control under File: Options: Display.

Now we have a letter heading Template in Word which to all intents and purposes looks quite normal in Word, but when translated into braille it will follow the correct braille rules.
Duxbury Systems, Inc.,
270 Littleton Rd., Unit 6,
Westford, MA
01886-3523 USA
Telephone: +1 978 692 3000
Fax: +1 978 692 7912
Web: <b><MadCap:variable name="Primary.CompanyWeb" />
Email: General inquiries: info@duxsys.com