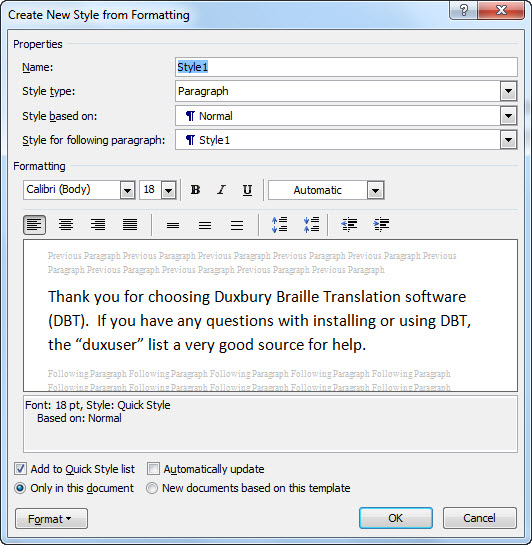
Create a Word Style
Keystroke: Alt + Ctrl + Shift + S
Note: Word may not place focus on this dialog. Pressing F6 will allow you to navigate to this.
Once you are focused, up/down arrow will allow you to move up and down the list of Styles, while Tab will take you round the various icons.
You may also click on the small arrow shown in the screen shot below to bring up this Styles dialog.

Tab to, or click on, the "New Style" icon shown highlighted above, and the following dialog will appear. This may at first appear quite intimidating but we will explain each section as best we can.

Properties (or n)
Name: In theory, this can be almost anything, but consider that you will usually want to have your Style "mapped" to a DBT Braille Style. If that style exists in DBT, then use the exact same name. If it does not already exist in DBT, ensure that you use the same name in both Word and DBT when creating Styles. But see the next item which is important.
Style Type (or t)
This is a drop down list box which allows you to select five different Style Types. For the moment, we will only be looking at Paragraph and Character Styles.

Paragraph:
This is where a Style applies strictly to an entire paragraph. A paragraph is defined as the text between two Hard Returns. To see these returns in Word, click on the Pilcrow sign ¶ usually found in Word's Home Ribbon show below. (Clicking again will toggle show/hide) The keystroke is Ctrl + * - do not forget to use the shift key to produce the asterisk.

Character:
This is where text within a paragraph has a specific Style applied to it, such as the word "within" in this sentence which is italicised.
At this stage we will not look at Linked, Table or List Styles.
Style based on:
It may be that you wish to create a Style which is based on another, and just has minor differences. For example you might want to have a similar style to the "Normal" Paragraph Style, but in 16 point, and perhaps call it, "Normal 16".
Style for following paragraph: If you are entering many paragraphs of the same Style you can enter the same name as you entered above. When you have completed on paragraph and press Return for the next, you will still be using the same Style as the previous.
However, in cases such as Headings, for example, you would not normally follow a Heading with a Heading of the same Style. Consequently you can have a different Style, such as perhaps Normal, automatically used for the next paragraph.
Formatting:
This section is generally straightforward and allows you to select which Font you wish to use, its size. Bold, Underline, Italic, as well as justification and line spacing.
Did I mention Color? It is sometimes a good idea to use this, especially if you are preparing text which contains a foreign language. If you are sighted, this is a good way of ensuring you have or have not applied a language Style. (But see Language" below)
Style for the following paragraph:
If you have selected a Paragraph Style, the purpose of this is to allow you to pre-select the Style for the following paragraph.
Formatting Section:
You should already be quite familiar with the contents in this section. However, as suggested above, you may wish to change the colour. This is the drop down List Box shown above as "Automatic". As an example, if you are applying language Styles, it often helps if they are visually highlighted in some way.