How to Add Navigation Buttons in Word 2007 and 2010
The web toolbar of Microsoft Word 2003 was very useful to navigate through a large document. Later versions of Word do not have it (by default). However, there is a way to customize the toolbar to re-add the Back and the Forward buttons. Follow these steps.
Click the Microsoft office (File) button in the top left corner of your Word window.
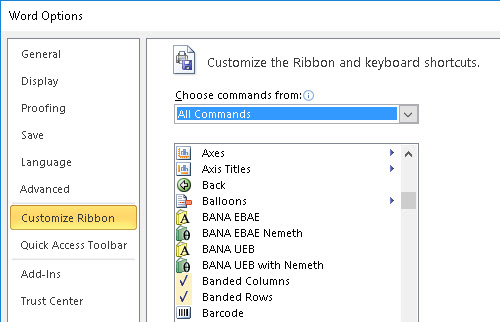
Click on “Word Options” at the bottom right of the dialog.
Click on “Customize” from the left pane.

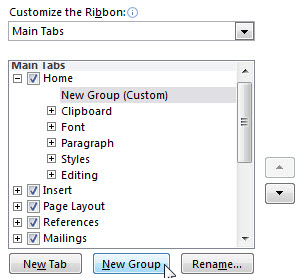
Look at the right hand side of the Options dialog where we will add a sub-tab to the "Home" tab which we will name, "Navigation".

Click on the + (Plus) sign beside "Home" to expand it, and ensure that "Home" is highlighted.
Now click the"New Group" button. (Use the arrows on the right hand side to move this up to the top of the list. We have put ours at the top, as it will then appear on the left hand side of the Home ribbon.
The last step is to right click on "New Group (Custom)", and select "Rename". In our case, we called it "Navigation".
Now back to the left hand side of the dialog.

In the “Choose commands from” drop-down menu, select “All Commands”.
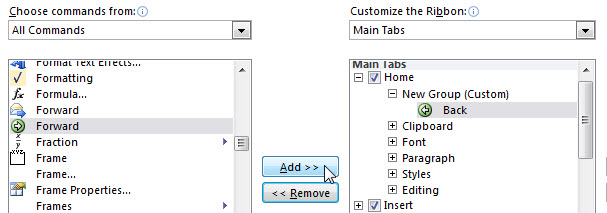
From the list of commands find “Back” and click the Add button. (This has been added in our illustration above)
Similarly, find “Forward” and click Add again.
Finally, click the OK button at the lower right of the dialog.
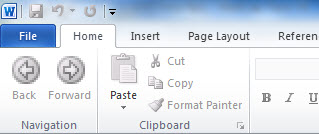
Your "Home" ribbon should now look something like the following.

You will now find that when you use Ctrl + mouse-click on, say, one of the items in the Table of Contents, you will not only be taken to the selected Topic, but the "Back" arrow will become green (to bring you back).