Paragraph Styles Group

This group includes menus for paragraph styles and page setups. The menus are categorized to allow faster access to a small set of related styles.
Style names are provided for those who take a normal word processing approach to the component elements of a document and who may not be familiar with the indentation and runover margin required in braille for a particular format. On the other hand, the Numbered menu may be preferred by those who think of format in terms of the specific indent and runover in braille. Using the Numbered menu also avoids any "side effects" of the named styles, such as skipped lines or block protection, when they are not intended. For example, it may be preferable to use numbered style 1-3 instead of the named style List in some circumstances.
For reference, here is the list of paragraph styles that include skipped lines as part of the style definition. This corresponds with the desired formatting in braille in the most usual case.
- Attribution: blank line after.
- CBC-Display: blank line before and after.
- Cross Reference: blank line before and after.
- Directions: blank line before. (However, there is no blank line between Heading 2 and Directions; no blank line between Heading 3 and Directions.)
- Heading 1: blank line before and after.
- Heading 2: blank line before.
- Heading 3: blank line before.
- List: blank line before and after full list (no blank line between Heading 2 and List; no blank line between Heading 3 and List).
- Quote: blank line before and after.
Paragraph Styles is a large group. Each of the menus in the Paragraph Styles group is presented in its own section below.
Body Menu
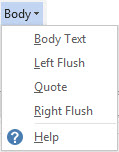
The definition for each Body style is given in terms of the basic left margin and runover position, with additions as required.
Quote: 3-1, with a blank line before and after.
Right Flush: flush to the right margin. (Note: This style does not align the first character of multiple Right Flush paragraphs.)
Contents Menu
This menu contains styles used on Table of Contents (TOC) pages.
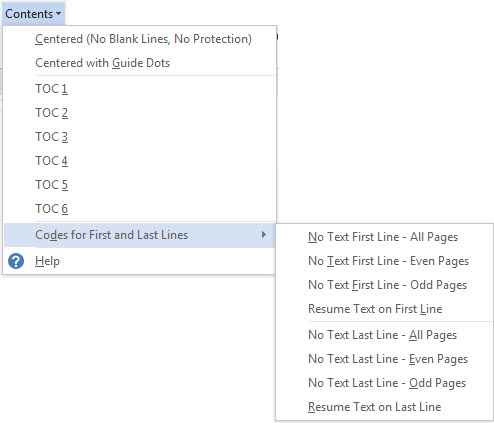
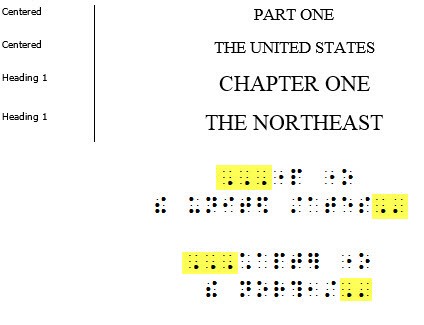
Centered: This style can be used for centered headings, such as Unit/Part, that don’t have a TOC entry page number.
Centered with Guide Dots: Use this style when a Unit/Part heading includes an entry page number. This keeps the heading centered and allows you to use the Guide Dots character style for the page number. A long “Centered with Guide Dots” heading needs to be divided by pressing Enter at the most appropriate location. This results in two (or more) consecutive “Centered with Guide Dots” paragraphs. The last line includes the page number.
TOC1 - TOC6: Applying these styles to TOC entries creates a nested list format, and DBT automatically adjusts the runover.
Codes for First and Last Lines: These codes keep text from appearing on the first and last lines of the braille page, thereby interfering with table of contents entry page numbers. Insert the appropriate first-line codes at the top of the table of contents. Typically a transcription to be embossed single-sided will require "No Text First Line - All Pages". Codes to suppress the first line do not need to be used when a running head is used. If braille page numbers are suppressed on even pages for interpoint, select the appropriate option.
Once the table of contents is completed, it is necessary to insert the Resume Text on First Line and Resume Text on Last Line codes so text will again appear on the first and last lines. (See the sample file: front_matter_pages.docx)
No Text First Line - All Pages: [[*svrhp3*]][[*tls*]] [[*tle*]]
No Text First Line - Even Pages: [[*svrhp2*]][[*tls*]] [[*tle*]]
No Text First Line - Odd Pages: [[*svrhp1*]][[*tls*]] [[*tle*]]
Resume Text on First Line: [[*tld*]]
No Text Last Line - All Pages: [[*svrfp3*]][[*rfs*]] [[*rfe*]]
No Text Last Line - Even Pages: [[*svrfp2*]][[*rfs*]] [[*rfe*]]
No Text Last Line - Odd Pages: [[*svrfp1*]][[*rfs*]] [[*rfe*]]
Resume Text on Last Line: [[*rfd*]]
Exercise Menu
Exercise - BANA UEB & BANA EBAE templates
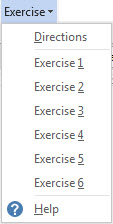
Note: Directions following a running head or print page indicator are preceded by a blank line. Subsequent paragraphs are automatically indented two cells (7-5).
Exercise 1 - Exercise 6: The nested list format is used for the Exercise styles, and DBT automatically adjusts the runover.
Exercise - BANA UEB with Nemeth & BANA EBAE Nemeth templates
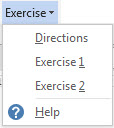
Directions: 5-3
Exercise 1 - Exercise 2: 1-3 for a single level exercise; and 1-5, 3-5, for two or more levels.
Glossary Menu
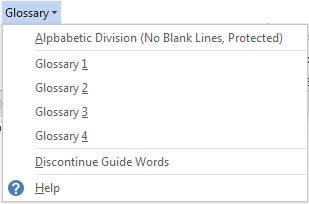
Alphabetic Division: At least one line of text appears with the Alphabetic Division at the bottom of a braille page.
Glossary 1 - Glossary 4: The nested list format is used for the Glossary styles, and DBT automatically adjusts the runover.
Discontinue Guide Words: inserts the code [[*rfd*]] on the next page after the completed glossary. The code needs to go on the page after the completed glossary, otherwise guide words will not appear on the last page.
Headings Menu

Centered (No Blank Lines, No Protection): can be used in conjunction with Heading 1 to easily separate multiple major headings and to get the required blank lines.
Centered (Full Line Width, No Blank Lines, No Protection): remains available for those who produce centered title pages.
Heading 1: Centered with a blank line before and after the heading.
Heading 2: 5-5
Heading 3: 7-7
All headings are preceded by a blank line. DBT suppresses the blank line between Heading 2 and Heading 3 automatically.
Running Head: use of a running page header is an agency decision.
Index Menu
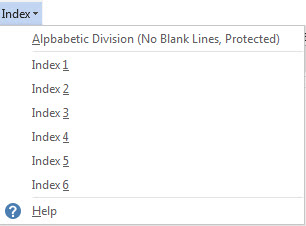
Alphabetic Division: At least one line of text appears with the Alphabetic Division at the bottom of a braille page.
Index#: The nested list format is used for the Index styles, and DBT automatically adjusts the runover.
List Menu

List#: The nested list format is used for the List styles, and DBT automatically adjusts the runover.
Misc Menu
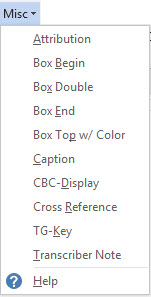
Attribution: is set to produce a 5-5 format to conform with the guidelines of four cells to the right of the previous line. However, it is necessary to use another style (such as a numbered style) for an attribution requiring a different indent/runover. Subsequent paragraphs are automatically indented two cells (7-5).
Box Begin: inserts a full line of SimBraille (dots 2356). DBT automatically adjusts this line for the first and last line when there is a print or braille page number.

Box Double: inserts a full line of SimBraille (dots 123456). DBT automatically adjusts this line for the first and last line when there is a print or braille page number.

Box End: inserts a full line of SimBraille (dots 1245). DBT automatically adjusts this line for the first and last line when there is a print or braille page number.

Box Top w/ Color: is a new option to comply with Formats 2016, when it is necessary to indicate a colored box. Selecting this inserts the transcriber’s notes codes, with the word color between the codes. Note it is necessary to have non-printing characters visible in Word to see the codes.
![[[*tns*]]color[[tne*]] [[*tns*]]color[[tne*]]](../../../Resources/Images/BANA_Template_2017_Help/box_top_color_base.jpg)
Replace the word color with the color of your box.
![[[*tns*]]pink[[*tne*]] [[*tns*]]pink[[*tne*]]](../../../Resources/Images/BANA_Template_2017_Help/box_top_color_modified.jpg)
There is no SimBraille fill for the rest of the line. Use a regular Box End.
CBC-Display: 1-2 with a blank line before and after the displayed text. This is automatically uncontracted.
Cross Reference: 7-5 with a blank line before and after the cross reference.
TG-Key: is used for textured tactile graphics keys; it is a 6-8 format.
Transcriber Note: formats the paragraph as 7-5 and encloses the paragraph in transcriber’s note indicators. The transcriber’s note can have multiple paragraphs, which will be in 7-5 format. DBT will enclose the note within the TN indicators. Use the Transcriber’s Notes codes or the SimBraille indicators on the DBT Codes menu for transcriber’s notes with different types of format (headings, list, etc.).
Notes Menu
Notes - BANA UEB and BANA UEB with Nemeth templates
The Notes menu provides support for various types of footnotes and endnotes.
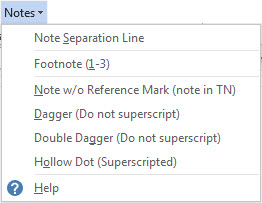
All notes are handled manually, because Formats 2016 follows the print appearance for all note indicators, which often are not the same at the point of reference and they appear before the note. (See sample file: footnote_manual.docx)
Note Separation Line: Insert this style to indicate the start of a list of notes at the bottom of a print page. This style inserts SimBraille (dots 5, 35, 35, 35, 35, 35, 35) beginning in cell 1.

Footnote (1-3): Use this style for the list of notes. Follow the print for the correct note indicator. Dagger, and Double Dagger are included in the menu and are not to be superscripted. The Hollow Dot is also included in the menu and is already superscripted. Use the asterisk (*) as is on the keyboard. Select numbers or letters and apply a superscript to them as needed (Ctrl+Shift++).
Notes - BANA EBAE and BANA EBAE Nemeth templates
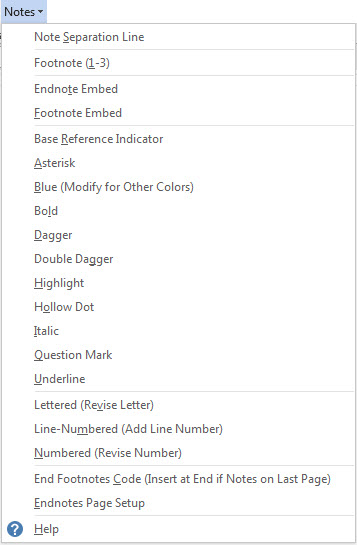
The Notes menu provides support for various types of notes and endnotes.
There are multiple ways in which notes can be handled in the Word file.
- Notes can be inserted within a paragraph, using the Footnote Embed style, and DBT will automatically insert the Note Separation Line and move the notes to the end of the print page. When this approach is used, the NoteRef indicator is only inserted once, before the Footnote Embed style. DBT will automatically insert the NoteRef indicator at the beginning of the note, at the end of the print page.
Warning: If notes appear on the last print page, it is necessary to insert the End Footnotes Code at the end of the file to force DBT to recognize the end of the page and insert the notes. (See sample file: footnote_manual.docx) - Note indicators can be inserted at the point of reference, with the Note Separation Line and notes inserted at the end of the print page by the producer. This may be the best option when notes already appear at the end of the print page, such as in a scanned file. (See sample file: footnote manual_ebae.docx)
- Word’s Footnote and Endnote features can be used, but this is only appropriate when all the note indicators are the same. This particular Word feature may still have some bugs.
Endnote Embed: This style is used when notes are moved to a separate section. It is supported with the Endnotes Page Setup, which automatically inserts the necessary codes so that DBT knows where to move the notes.
At this time it will be necessary to modify the DBT file to include the print page number for each note.
(See sample file: endnotes.docx)
Numbered Menu
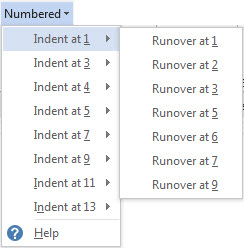
Indent at # -> Runover at #: These styles can be used when total control of the braille format is desired. They are especially useful when blank lines are not wanted. Use 1-6 and 4-6 styles for partially bulleted lists.
Plays Menu
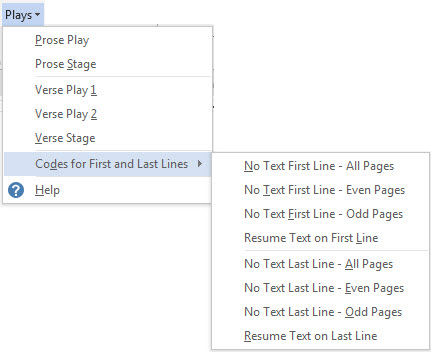
Prose Stage: 7-7 with subsequent paragraphs automatically indented two cells (9-7)
Prose Stage EBAE: 5-5 with subsequent paragraphs automatically indented two cells (7-5)
Verse Play 2: 3-5
Verse Stage: 7-7 Subsequent paragraphs are automatically indented two cells (9-7).
Codes for First and Last Lines:
Line numbered prose or verse cannot appear on the first or last line of a braille page (to keep print and braille page numbers from interfering with the line numbers in the right margin). Which option to select is based on whether the braille page numbers appear on every page. However, if a running head is used, the first line code isn’t needed.
No Text First Line All Pages [[*svrhp3*]][[*tls*]] [[*tle*]]
No Text First Line Even Pages [[*svrhp2*]][[*tls*]] [[*tle*]]
No Text First Line Odd Pages [[*svrhp1*]][[*tls*]] [[*tle*]]
Resume Text on First Line [[*tld*]]
No Text Last Line All Pages [[*svrfp3*]][[*rfs*]] [[*rfe*]]
No Text Last Line Even Pages [[*svrfp2*]][[*rfs*]] [[*rfe*]]
No Text Last Line Odd Pages [[*svrfp1*]][[*rfs*]] [[*rfe*]]
Resume Text on Last Line [[*rfd*]]
After the completion of the line numbered material, it is necessary to insert the Resume Text on First and Last Line codes to allow text to once again appear on those lines. (See sample file: line_numbered_poetry_with_right_margin-codes.docx)
Poetry Menu
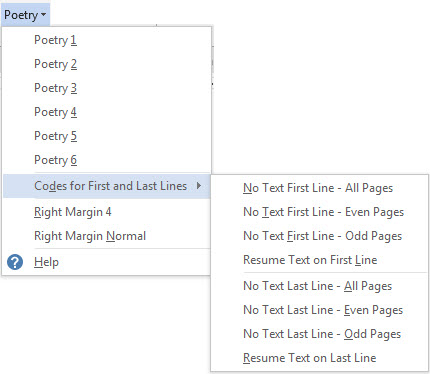
Poetry#: The nested list format is used for the Poetry styles, and DBT automatically adjusts the runover.
If the poetry has line numbers, see the discussion of “Codes for First and Last Lines” in the Plays section above.
Right Margin 4: [[*rm4:4*]] and
Right Margin Normal: [[*rm0:0*]] are included in this menu for convenience when the right margin needs to be adjusted for line numbering.
Tables Menu
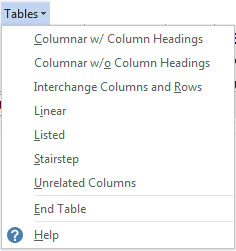
Selecting the desired table type (Columnar, Linear, Stairstep, etc.) inserts the appropriate codes before the table. If box lines are used with the table, the table code goes on the next line after the box line (Box Begin, Table Start code … Box End, End Table code). Make sure to use End Table after the completion of the table.
Columnar w/ Column Headings: [[*htbs;r:1:0:b:n:c*]]
Columnar w/o Column Headings: [[*htbs;r:0:0:b:n:c*]]
Interchange Columns and Rows: [[*htbs;r:1:1:b:y:c*]]
Linear: [[*htbs;r:0:0:b:n:p*]]
Listed: [[*htbs;r:0:0:b:n:l*]]
Stairstep: [[*htbs;r:0:0:b:n:s*]]
Unrelated Columns: [[*htbs;u*]]
End Table: [[*htbe*]][[*sk1*]]
Page Setups Menu
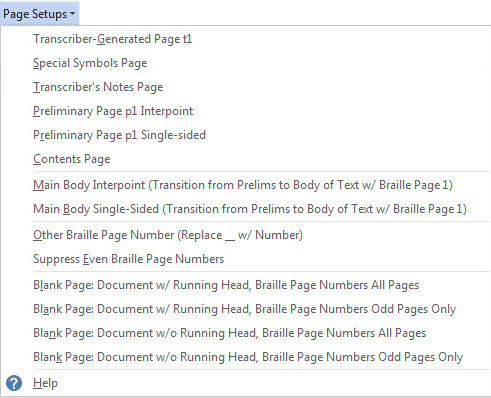
The items on this menu help provide the correct format for front matter pages. These page setups are used when the braille includes one or more of the various types of front matter (preliminary pages).
Show/Hide (Ctrl+*) must be active.
Transcriber-Generated Page t1: This style inserts informational text that is deleted when the file is opened in DBT. Insert this at the beginning of the file to set up the "t" braille page numbers.
Special Symbols Page: This style forces a new braille page and inserts the SPECIAL SYMBOLS USED IN THIS VOLUME heading.
Transcriber’s Notes Page: This style forces a new braille page and inserts the TRANSCRIBER’S NOTES heading.
Preliminary Page p1 Interpoint: inserts informational text that is deleted when the file is opened in DBT. Text is forced to a right hand page for interpoint. Preliminary Page p1 Interpoint is necessary for transitioning from "t" pages to "p" pages and to set the braille page number as "p1".
Preliminary Page p1 Single-sided: inserts informational text that is deleted when the file is opened in DBT. Text is forced to the top of the next braille page. Preliminary Page p1 Single-sided is necessary for transitioning from "t" pages to "p" pages and to set the braille page number as "p1".
Contents Page: This style forces a new braille page and inserts the CONTENTS heading, along with the Chapter line. It will be necessary to modify "CONTENTS" and "Chapter" if other text is used in the print.
Main Body Interpoint: This inserts informational text that is deleted when the file is opened in DBT. The primary purpose is to discontinue the running head if used (insert again after full title), force a new right hand braille page for interpoint, and to set the braille page number at 1.
Main Body Single-sided: This inserts informational text that is deleted when the file is opened in DBT. The primary purpose is to discontinue the running head if used (insert again after full title), force a new braille page, and to set the braille page number at 1.
Other Braille Page Number (Replace __ w/ Number): [[*pv__*]][[*pnta*]]
For those who start a volume on a braille page other than 1, use this code and replace the underscore in the code with the appropriate number. The code will be inserted as a LeftFlush paragraph. Don’t insert other text in the paragraph. It must be placed between the MainBody and the Textbook Reference Page Number (RefPageNumber) paragraphs (either before or after the [[*rfd*]] code paragraph will work).
Suppress Even Braille Page Numbers: [[*svpnp4:0:2:2*]]
Blank Page options: These four choices support those who need to insert a blank page on the back of a tactile graphic. All options force the blank page to be an even page. The page is totally blank. Page numbers are implied and continue on the next page after text resumes. When a Running Head option is used, the yellow highlighted text needs to be replaced with appropriate text. (Possible conflict: be sure to delete the highlighting if yellow highlighting is used to indicate typeform indicators!)
Blank Page: Document w/ Running Head, Braille Page Numbers All Pages:
[[*top*]][[*svpnp0:0:0:0*]][[*svrhp3*]][[*tls*]] [[*tle*]][[*pg*]]
REPLACE THIS TEXT WITH RUNNING HEAD
[[*svpnp4:4:2:2*]]
Blank Page: Document w/ Running Head, Braille Page Numbers Odd Pages Only:
[[*top*]][[*svpnp0:0:0:0*]][[*svrhp3*]][[*tls*]] [[*tle*]][[*pg*]]
REPLACE THIS TEXT WITH RUNNING HEAD
[[*svpnp4:0:2:2*]]
Blank Page: Document w/o Running Head, Braille Page Numbers All Pages:
[[*top*]][[*svpnp0:0:0:0*]][[*pg*]][[*svpnp4:4:2:2*]]
Blank Page: Document w/o Running Head, Braille Page Numbers Odd Pages Only:
[[*top*]][[*svpnp0:0:0:0*]][[*pg*]][[*svpnp4:0:2:2*]]
Page Setups - BANA EBAE and BANA EBAE Nemeth templates
Endnotes Page: This option is listed in this menu as well as the Notes menu. It inserts the codes and beginning text for an end notes page.
(See sample file: front_matter_pages.docx
DBT Codes Menu
DBT Codes - BANA UEB and BANA UEB with Nemeth templates
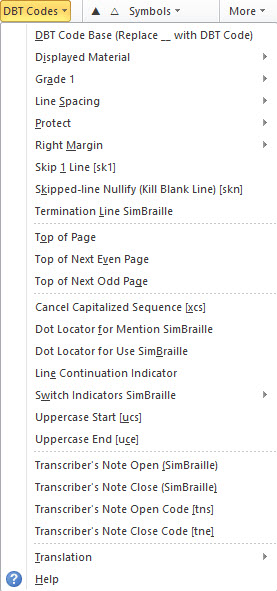
These menu items help control specific translation situations.
DBT codes allow even finer control for preparing a file for braille translation. Many of the common codes have been placed on these menus for easy access. Because the codes may be intrusive for general editing and printing, they are added to the document as hidden text. (It doesn’t matter to the importer whether DBT codes are hidden text or normal text.) To see the codes, it is necessary to work with non-printing formatting marks turned on by clicking ¶ Show/Hide (Ctrl+*).
The codes appear in plum colored text with a faint dotted underline. How or when you choose to see the DBT codes is personal preference, although it is suggested they be visible while codes are being inserted into the document. The hidden code/text cannot be deleted or modified if it is not visible.
You can set an option if you would like to see only the hidden text without seeing the rest of the non-printing formatting marks. Those who use screen readers will find this option preferable.
Word 2007: Go to Office Button, Word Options, Display. Find section: Always show these formatting marks on the screen and check: “Hidden text”.
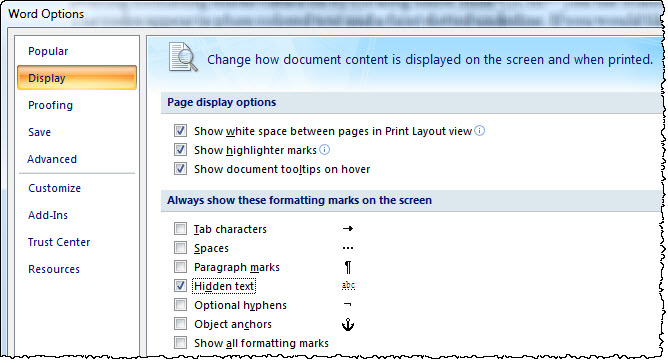
Word 2010/2013/2016: Go to File, Options, Display, section Always show these formatting marks on the screen, check: “Hidden text”.
DBT Code Base (Replace __ with DBT Code)
There are many DBT codes not included in the BANA Braille template. When it is necessary to insert one of these codes, you can insert this as the basic code markup, and replace the underscores within the brackets and asterisks [[*__*]] with the needed code.
Displayed Material

Displayed Material codes adjust the left margin in a displayed section.
Insert the Displayed Material Start code [[*svlma:2*]][[*sc1:1:1*]] before the displayed material section. This code creates a cell-3 left margin. Heading 1 (centered) remains centered on the full width of the page. All other styles are offset by 2 cells to the right.
After the completion of the displayed section, use the Displayed Material End code, [[*sc1:0:1*]][[*svlma:0*]].
To create a left margin beginning in cell 5, modify the Start code to [[*svlma:4*]][[*skn1:1*]].
(See sample file: displayed material.docx)
Grade 1
Grade 1 Following Word: [[*i*]]
Grade 1 and Prefix with Grade 1 Indicator: [[*ii*]]
Line Spacing

Double line spacing (braille on every other line) is typically used in early grade books (after the title page).
Line Spacing Single [[*svsbl0*]]
Line Spacing Double [[*svsbl1*]]
Number Sign

Other than in Nemeth (math), this set of codes has limited use.
Omit Number Sign Start [[*ons*]]
Omit Number Sign End [[*one*]]
Protect
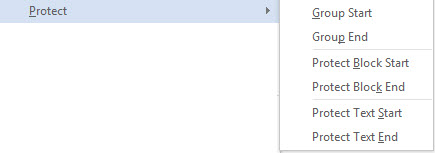
Group: Used to keep text grouped together on a single line or treated as a single unit. The example below keeps “artificial intelligence” on the same line.
Group Start [[*:*]]
Group End [[*;*]]
Example: [[*:*]]artificial intelligence[[*;*]]
Protect Block: Used to keep a block of text on a single page. A typical use is to keep test question and answer choices on a single page. (See sample file: test_with_protected_questions.docx)
Protect Block Start [[*kps*]]
Protect Block End [[*kpe*]]
Protect Text: When possible keeps text on a single line and page. For example, use these codes to prevent a telephone number from dividing between lines or between two pages.
Protect Text Start [[*kbs*]]
Protect Text End [[*kbe*]]
Example: [[*kbs*]]1-800-555-5555[[*kbe*]]
Right Margin

Used to set the right margin with line numbered prose and poetry when text other than line numbered material appears on the braille page. (See sample file: line numbered poetry with right margin codes.docx)
Right Margin Normal [[*rm0:0*]]
Right Margin 3 [[*rm3:3*]]
Right Margin 4 [[*rm4:4*]]
Right Margin 5 [[*rm5:5*]]
Right Margin 6 [[*rm6:6*]]
Skip 1 Line [sk1]

This code is not needed very often, as lines can be skipped by pressing the Enter key (make sure DBT’s Word Importer is set to Preserve Skipped Lines). However, there are times, especially with tables, when this code helps DBT do a better job at determining a transition to a different type of text.
Skipped-line Nullify (Kill Blank Line) [skn]
![Skipped-line Nullify (Kill Blank Line) [skn] Skipped-line Nullify (Kill Blank Line) [skn]](../../../Resources/Images/BANA_Template_2017_Help/skn.jpg)
This code, as is, [[*skn*]] cancels one skipped (blank) line where one would normally occur as part of a style (either before or after the paragraph). DBT 12.2 is better at handling this automatically between some styles (for example, between Heading 2 and Heading 3, or between a top box line and headings), but there still may be situations where the [[*skn*]] code is desirable. Note, as an option, one of the Numbered styles can be used instead of a style with an associated blank line.
Forces a new line and maintains the correct runover position for DBT.
Termination Line SimBraille
A termination line (dot 5 followed by 12 consecutive dots 2-5, centered on a new line) can be used in magazines or newsletters in non-instructional material.

Top of Page Codes

These codes are conditional new braille page breaks (i.e. they have no effect if already at the top of a page). They are inserted in a LeftFlush style and it is best not to include any text within the same paragraph.
“Top of Next Even Page” and “Top of Next Odd Page” are used with interpoint (braille on the front side and back side of each sheet).
Top of Page [[*top*]]
Top of Next Even Page [[*top*]][[*sd0*]]
Top of Next Odd Page [[*top*]][[*sd1*]]
Cancel Capitalized Sequence [xcs]
![Cancel Capitalized Sequence [xcs] Cancel Capitalized Sequence [xcs]](../../../Resources/Images/BANA_Template_2017_Help/xcs.jpg)
This code manually interrupts a capitalized passage. For example:
"I assure you, THAT FUSE IS TOO SHORT.[[*xcs*]] BUT IF YOU INSIST, go ahead and light it – after I have left." (See Codes Quick Reference)
Note: DBT breaks a capitalized passage automatically when transitioning from one style to another, as shown.
Dot Locator for Mention SimBraille

Use this as a quick option for inserting the SimBraille for a dot locator for mention. .=
Dot Locator for Use SimBraille

Use this as a quick option for inserting the SimBraille for a dot locator for use. ""=
Line Continuation Indicator [[*q~"*]][[*l*]][[*run*]]

is used to indicate a break-point for a long URL, e-mail address, etc..
Switch Indicators SimBraille

Note: DBT automatically inserts the IPA switch indicators when the text is marked up using the IPA character style.
These controls produce manual switch indicators as needed.
Non-UEB Word Indicator ^(
Non-UEB Word Terminator ^)
Opening Non-UEB Passage Indicator "(,
Closing Non-UEB Passage Indicator ,")
Music Open Indicator ,'
Music Terminator ;2
Uppercase Start [ucs]
![Uppercase Start [ucs] Uppercase Start [ucs]](../../../Resources/Images/BANA_Template_2017_Help/ucs.jpg)
This code allows for total control of capitalized passages. Insert [[*ucs*]] before the start of the capitalized passage. The text must be entered as lowercase letters.
Uppercase End [uce]
![Uppercase End [uce] Uppercase End [uce]](../../../Resources/Images/BANA_Template_2017_Help/uce.jpg)
This code is used in conjunction [[*ucs*]] above. Insert [[*uce*]] at the end of the capitalized passage.
Transcriber’s Note
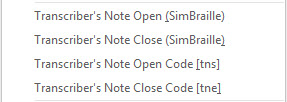
These four options allow the use of SimBraille or codes to insert Transcriber’s Note indicators. Be aware that there is a Transcriber’s Note style that automatically inserts the indicators for full 7-5 paragraphs. Also, the TN-Embed command (in Character Styles) is another option for inserting Transcriber’s Note indicators for short embedded passages.
Transcriber’s Note Open (SimBraille) @.<
Transcriber’s Note Close (SimBraille) @.>
Transcriber’s Note Open Code [tns] [[*tns*]]
Transcriber’s Note Close Code [tne] [[*tne*]]
Translation

Use the Grade 1 codes at the beginning of a file if the entire document should be translated to uncontracted braille.
Grade 1 (Uncontracted): [[*tx*]][[*g1*]]
Grade 2 (Contracted): [[*tx*]][[*g2*]]
DBT Codes - BANA EBAE and BANA EBAE Nemeth templates
The EBAE version of the DBT Codes menu has mostly the same options as the DBT Codes menu for BANA UEB. The menu options not already explained (above) are listed and described below.
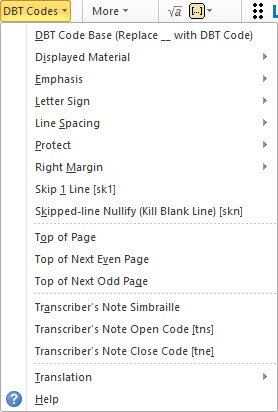
Emphasis

Note: Do not format bold/italic text with another character style (such as uncontracted or Spanish), as Word will delete the bold/italic font attributes. Apply the character style first and then add the bold/italics on top of the styled text. Sometimes it is easier to use the emphasis codes instead of using bold/italics.
Bold Start: [[*fts~b*]]
Bold End: [[*fte~b*]]
Italics Start: [[*fts~i*]]
Italics End: [[*fte~i*]]
Letter Sign

It may be necessary to force or suppress a letter sign for correct translation. Being aware of this and inserting the appropriate codes in the Word file can save time later.
Letter Sign Force: [[*ii*]] Example: Put the book in box [[*ii*]]b.
Letter Sign Suppress: [[*i*]] Example: Henry [[*i*]]V (Note: This code will also uncontract everything before the next space.)
Nemeth Indicators (SimBraille)

Formats 2011 allows the use of Nemeth indicators for short sections of Nemeth in nontechnical books.
The SimBraille Nemeth Begin indicator is followed by a hard, nonbreaking space _%
The SimBraille Nemeth End indicator is preceded by a hard, nonbreaking space _:
Transcriber’s Note

These three options allow the use of either SimBraille or codes to insert Transcriber’s Note indicators. Be aware that there is a Transcriber’s Note style that automatically inserts the indicators for full 7-5 paragraphs. Likewise, the TN-Embed (in Character Styles) is another option for inserting Transcriber’s Note indicators for short embedded passages.
Transcriber’s Note SimBraille ,'
Transcriber’s Note Open Code [tns] [[*tns*]]
Transcriber’s Note Close Code [tne] [[*tne*]]