Custom Installation
Before reading this topic, you should read through the instructions for a Simple Installation. That topic covers all the basic instructions for installing DBT. This topic simply explains how to modify the Simple Installation steps to customize your own installation.
There are a few ways to modify a Simple Installation. You can elect to:
- Install the extra features,
- Change where the software is installed,
- Change where the DBT activation is stored, or
- Customize which features are installed.
Each of these customizations is covered in a separate section below.
Customization 1: Install Extra Features
The first thing to know here is that the Simple Installation installs nearly all DBT features already. The extra features are the French Braille Fonts, which are generally of interest only in French-speaking nations.
However, when you reach Step 4 of the Simple Installation instructions, if you want absolutely everything installed, then simply switch the Setup Type from Typical to Complete.
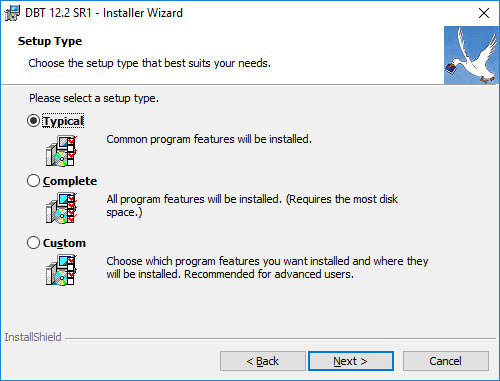
The remainder of the installation proceeds just as it does in the Simple Installation instructions.
Note: If you want to install all features and set a custom location for either DBT or its activation storage, then you must instead follow the steps below in "Customization 4: Customize Which Features are Installed." You can modify the installation directories only if you select Custom in the dialog shown above. Under Custom you can elect to install each and every feature.
Customization 2: Customize the DBT Installation Directory
Most of the files that comprise an installation are placed into, or under, a single standard folder on your computer. On 64-bit computers that folder is:
C:\Program Files (x86)\Duxbury\DBT 12.5
On 32-bit computers, the top level is slightly altered:
C:\Program Files\Duxbury\12.5. )
If the standard location of the DBT directory does not suit you, you can change it. To do so, when you see the dialog shown above (Step 4 of the Simple Installation instructions), you must select Custom. This choice causes the installer to insert two extra steps into the installation sequence, which appear when you continue via the Next button.
Note: If you do not alter any of the settings in either of these two additional steps, then the result is exactly the same as if you had followed the Simple Installation without elaboration. That is, the result is a "Typical" installation.
The first extra dialog, which allows you to change both the software and activation storage locations, is shown here.
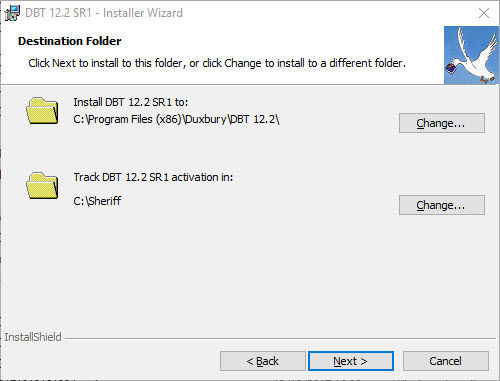
To change where the software is installed, click on the first Change button (or use the Tab key until you reach it, then strike the Spacebar). You then see a dialog that provides multiple ways to set a new DBT folder location.
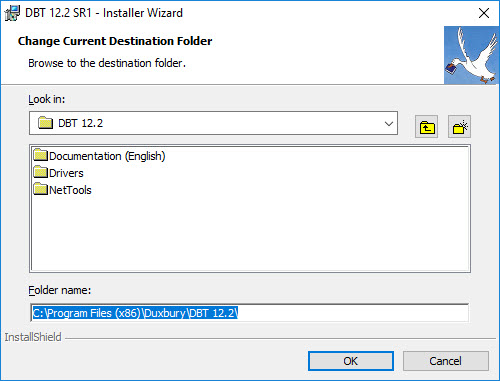
The drop-down list labeled "Look in" shows you the currently selected location for your new DBT. Opening that drop-down list allows you to look upwards in the file system hierarchy, to select a new location - or at least a new starting point. Whatever folder you select, the folders immediately below that level appear in the next control, which allows you to select folders going back down the file system structure until you find the folder location you want.
As an alternative, you can use the Parent Folder and Create New Folder icon buttons that appear to the right of the drop-down list to move up the file system hierarchy and to create a new folder.
Note: Whenever radiating lines appear on a folder icon, that indicates a new folder to be created.
Another alternative, possibly the simplest, is to use the editable text control near the bottom of the dialog. This control shows the full path to the prospective destination for DBT. In our case, this control contains, "C:\Program Files (x86)\Duxbury\DBT 12.5". This text control is already highlighted when the dialog appears. So be careful, because any text that you type will replace the entire currently displayed path. To avoid losing the part of the path you want to retain, we recommend using the left and right arrow keys (or your mouse) to set the cursor position before you start editing the text of this control.
More Hints: (1) If you want to change only the drive letter, you can jump to that point with the Home key. (2) If you make a mistake, click Cancel (or press Escape), to return to the parent dialog. Then you can once again select the Change button and return to this dialog with the prospective path displayed again. (3) The path that you specify does not need to exist. The installer creates the destination folder for you as well as any upper level folders required. You only need to have sufficient access privileges on the computer to create these folders.
When you have finished specifying the destination folder, click OK (or press Enter). This click brings you back to the Destination Folder dialog, which now reflects the destination you specified. If you are done customizing, click Next (or use Alt+N), to continue.
Or, if you also wish to change the folder for the DBT activation files, then read "Customization 3" below.
Note: While the Change Destination Folder dialog remains active, the Installer periodically checks to ensure that you are specifying a valid location — an existing folder to which you can write files, or a path that you can create. It checks again when you click OK to continue. If the path is not valid, the installer might pop up an error message like this one:
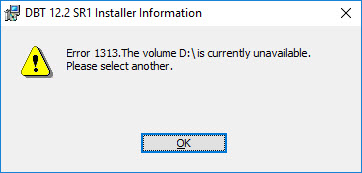
You can dismiss any such error message by clicking OK, but the Installer may then attempt to "fix your mistake" by resetting the destination folder to what it was when the dialog first appeared. Watch out for that.
Customization 3: Change Where the DBT Activation is Stored
DBT needs to store several activation files on your computer. These files are stored separately from DBT because, unlike the program files which are normally in a read-only directory, the activation files must be in a folder that is writable by any user. DBT normally places the activation folder at C:\Sheriff.
If you need to change the location of the activation files, follow the procedures as above, but using the second Change button in the Destination Folder dialog instead of the first. Be sure that you specify a location that your DBT users can read and write.
Note: If you want to make this change while updating or modifying a previous DBT installation, then the installer might need to deactivate DBT before relocating the activation files. It will do this automatically, but it will leave your software deactivated. You will have to activate again when you next run DBT.
Customization 4: Customize Which Features are Installed
When you select a Custom installation, the Destination Folder dialog (discussed above) is the first of two dialogs the installer inserts into the installation sequence. The second dialog allows you to choose the specific features to be installed.
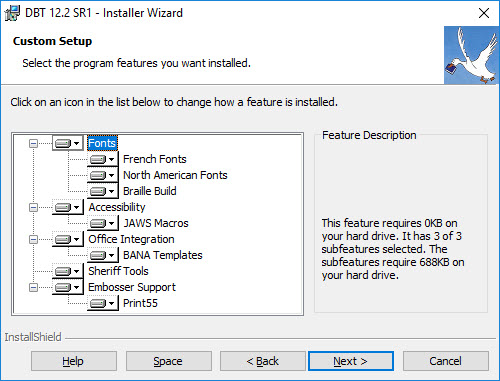
The heart of this dialog is the tree control on the left side. This control shows which features are currently selected, and it can be used to select or de-select other features. The tree control shows the name of each feature, but for certain features additional information is displayed in the Feature Description box to the right.
When the Feature Selection dialog is first displayed, all the feature groups are expanded, showing all the individual features. Moreover, (depending on the DBT release) most or all features are already selected for installation. Fortunately, you cannot de-select the basic features of DBT, so you can not create an installation that will not function.
The following keys can be used within the tree control:
- Up Arrow moves the selection to the previous item in the tree control, scrolling the control if necessary. Up Arrow does nothing if the first item in the control is already selected.
- Down Arrow moves the selection to the next item in the tree control, scrolling the control if necessary. Down Arrow does nothing if the last item in the control is already selected.
- Right Arrow moves the selection to the first individual item or subgroup within a feature group, expanding the tree control to show the contents of the feature group if necessary. Right Arrow does nothing when it is on an individual feature.
- Left Arrow moves the selection from an individual feature to the feature group that contains it. When a feature group is selected, Left Arrow hides the features within it, or does nothing if they are already hidden.
- Spacebar brings up a pop-up menu, explained below.
To de-select or select a particular feature, navigate to it in the tree control using the keystrokes listed above, or click on the feature with your mouse. Then right click on the feature or hit the Spacebar. The pop-up menu appears, as shown:
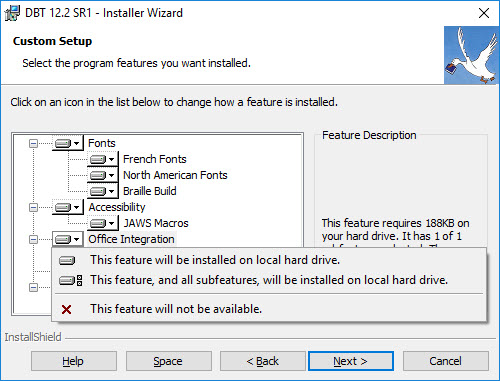
The pop-up menu contains these choices:
- This feature will be installed on local hard drive. This choice is the default for most individual features. It means that files related to this feature will be installed. However, if this is a feature group, rather than an individual feature, then selecting this choice does not imply that individual features within this group will automatically be installed.
- This feature, and all subfeatures, will be installed on local hard drive. This choice is available only for feature groups. Selecting it means that all files associated with the feature group, and all individual features within the group, will be installed.
- This feature will be installed to run from the network. This choice is not supported by DBT. Please, do not select it.
- This feature, and all subfeatures, will be installed to run from the network. This choice appears only for feature groups. DBT does not supportthis option. Please, do not select it.
- This feature will not be available. Select this choice if you do not want to install an individual feature. When you select this choice for a feature group, no feature within the group will be installed.
If you open the pop-up menu for a feature and decide that you do not want to change it, you can dismiss the pop-up using the Escape key and be sure of making no change. In contrast, dismissing the pop-up menu with the Enter key confirms the currently selected option, which may change whether the feature is to be installed.
When you are done making your selections, click Next (or type Alt+N) to continue.
Among the buttons at the bottom of the dialog, the Back, Next, and Cancel buttons serve their usual functions. The Help and Space buttons both bring up informational dialogs.
The Help dialog explains what the different choices in the pop-up menu mean and what the icon associated with each choice looks like. However, it does not mention that setting a feature to run from the network is not supported by DBT.
The Space dialog lists the computer hard drives and how much space is available on each. It indicates any hard drive that does not have enough space to install DBT. If you are tight on space you can use this dialog to explore where there might be room for DBT. Note that de-selecting features for installation reduces the space needed for the installation.