Technical Information for "ViewPlus" Embossers
General Advice about Computer Ports: Serial, Parallel, USB, and Network
Following a few notes about initial embosser setup, this topic explains steps you may need to take in order to (1) permit DBT to change options in the embosser driver software and (2) to set certain embosser options under "Printing Preferences" to control your embosser.
These tips may be helpful for all embossers that depend on the "Tiger Embosser Driver" from ViewPlus. This includes the ViewPlus embossers, of course, but also certain embossers sold by other vendors (APH and Irie).
Before you can make any setting changes, you need to connect your ViewPlus embosser to your computer, generally with a parallel cable. (Consult your embosser manual for options and details.) Next, you must install the Tiger/driver software, either from a CD-ROM or from the ViewPlus website.
Run the ViewPlus initial test program. (Assuming their software has not changed, you need to select Run Program: ViewPlus: Toolbox, then select Test Program.) The goal of the test is to get a sample page of output on the embosser.
Note: Your embosser should be set to run in "Tiger" mode (a.k.a., "embosser" mode). In this mode, the embosser relies on certain "printer" facilities in the Windows operating system. In Legacy mode, the ViewPlus embosser emulates a VersaPoint embosser. To use this mode, set the switch on the embosser to Legacy mode. Legacy mode is not covered in these notes.
Next, open DBT and add your embosser in Global: Embosser Setup. Do a short test output from DBT. If you do not have the Left Margin set to 1, you might lose the first character of each line of braille. You can set the left margin in the Global: Embosser Setup dialog.
The specific instructions below for setting access rights and embosser preferences cover the Windows operating system only.
Granting DBT Administrative Rights
Duxbury DBT needs to run the ViewPlus Tiger Embosser Driver with administrative rights, so that DBT can change settings in the driver, particularly to change between interpoint and single-sided embossing. DBT "inherits" those rights from the access rights of its user.
Here are the steps:
- Select Devices and Printers from the Control Panel.
- Right click on the Tiger Embosser and select Printer Properties.
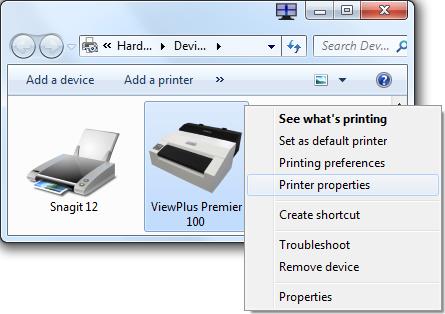
- You get to the following screen. Select the Security tab.
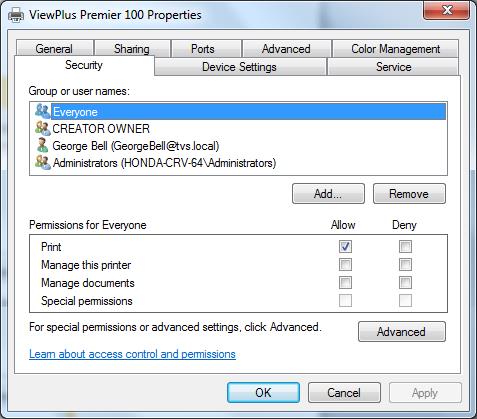
For all DBT users, allow full access to the ViewPlus driver software. In particular, "Manage this printer" must be checked for the user (or the user’s group, such as Administrators).

We repeat the example by granting rights via this user's group, the Administrators group.

If you have a different version of Windows, or different user groups, etc., these screens will differ. What does not change is the need to give access rights for the DBT users to the ViewPlus driver software.
If all users can switch between interpoint and single sided output from DBT, and the embosser obeys those choices, then you have updated these security rights correctly.
Setting Printing Preferences (More Embosser Controls)
Harkening back to the same screen shot from the Windows control panel above, you can select "Devices and Printers", find your embosser, and right click on it, to select "Printing Preferences" (just above "Printer Properties").
In the dialog that appears, you should find a "printing option" control that is the embosser equivalent of double-sided printing. That is, you can set a control for whether interpoint mode should emboss the reverse side by flipping the page on the left edge or the top edge. The usual choice is to flip on the left edge.
Know which way you have this control set, and do a short test of interpoint embossing to ensure you are getting the intended output. Getting it wrong can cause the lines of your page to emboss out of order.